What we're building
The smallest flow that actually does something: type a message, it goes to Gemini, the answer comes back. Three components, two connections. You'll build this by hand on the canvas first, then read the Python that produces the exact same flow as a .dump()'d graph.
Do this yourself
- In your still-running Langflow tab, click New Flow -> Blank Flow.
- From the Input & Output section in the left sidebar, drag a Chat Input onto the canvas.
- Search the component sidebar for "Google" and drag the Google Generative AI component onto the canvas, a real, built-in component, nothing to write yourself for this one.
- Open its settings and paste your
GOOGLE_API_KEY(the same one in this project's.env) into the Google API Key field, and set Model togemini-3.5-flash-lite, matching every other course in this repo. - From Input & Output, drag a Chat Output onto the canvas.
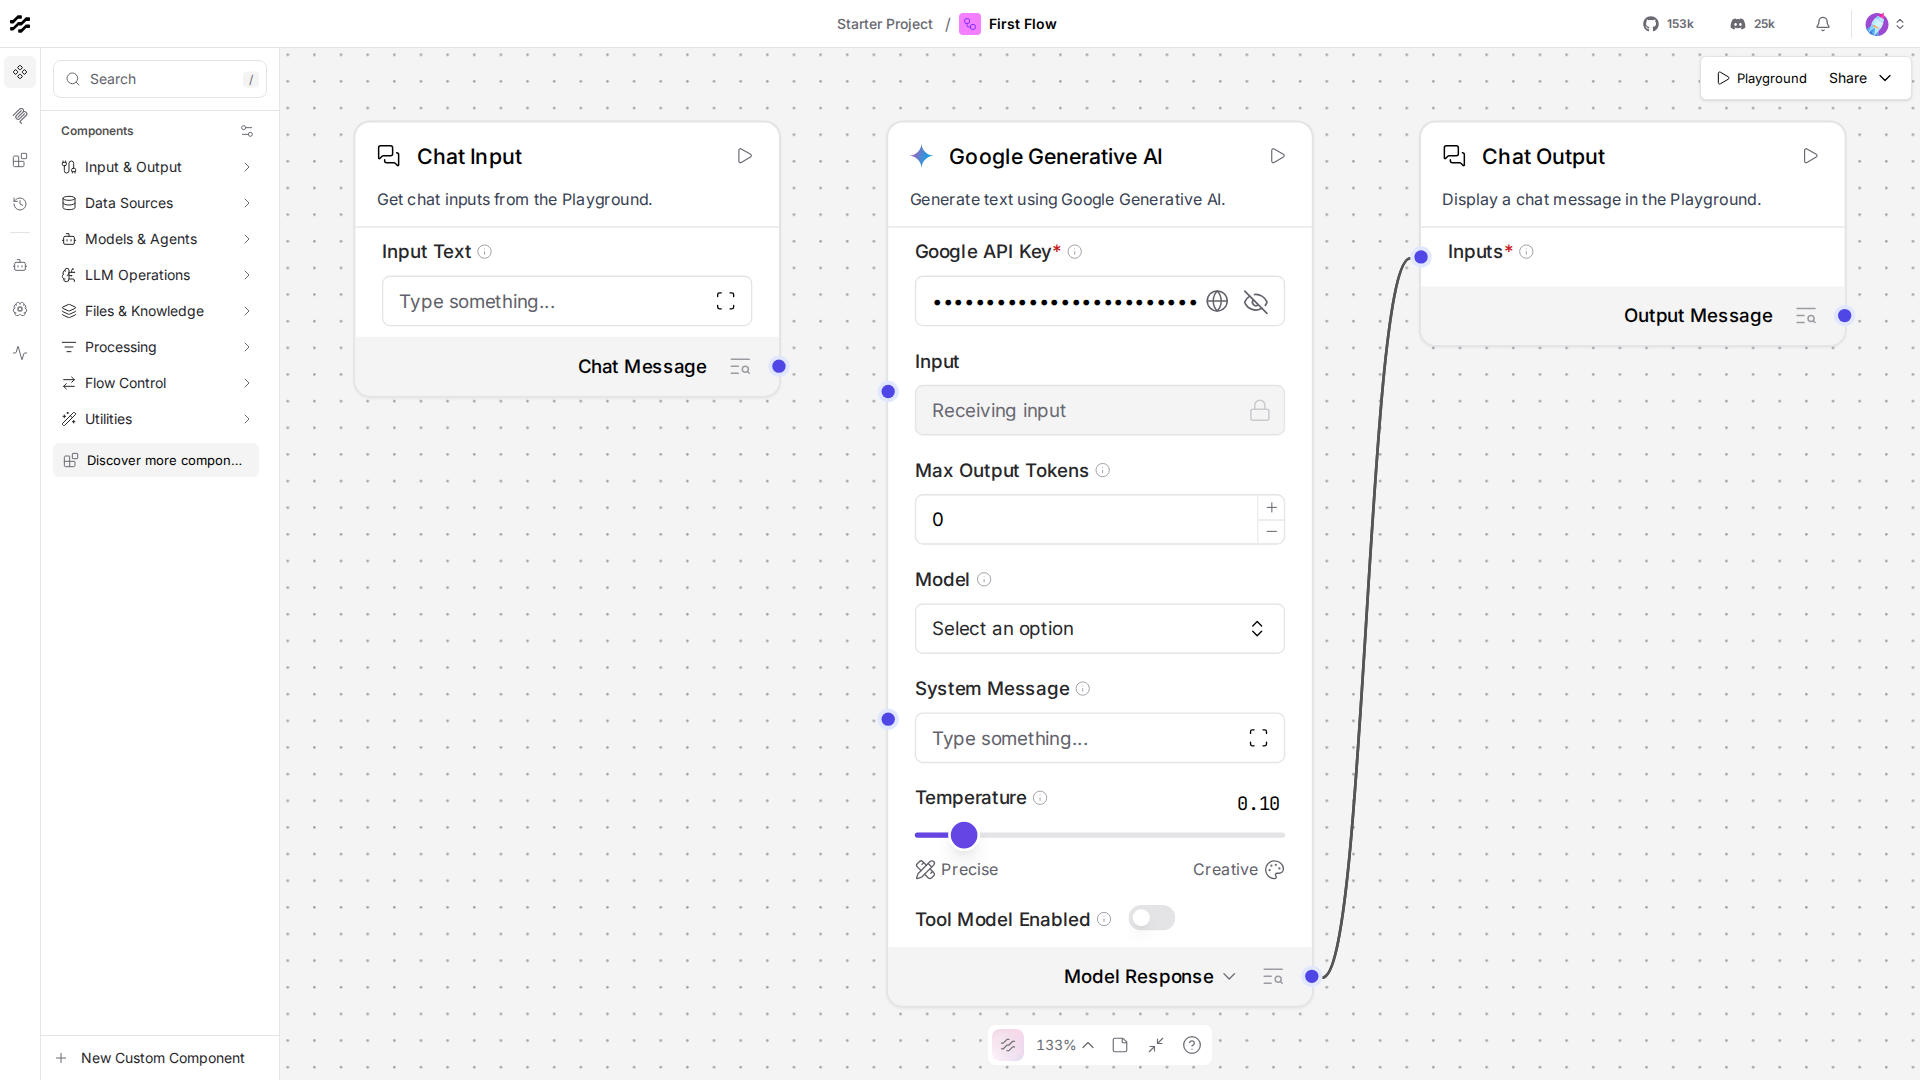
- Connect them: drag from Chat Input's output dot to the Google Generative AI component's
Inputdot, then from its output dot to Chat Output's input dot. - Click Playground (top right), type a message, confirm you get a real Gemini response back.
Compare what you built to this screenshot of the exact flow:
Why the built-in component, not a Custom Component
An earlier draft of this course used a small hand-written Custom Component here instead, it's a reasonable-looking shortcut, but it turns out to be the wrong one: Langflow's own component-migration subsystem doesn't recognize component types it doesn't ship, and hitting that path can trigger a real bug (an internal retry loop) on some runs, not something a lesson should route learners into by default. Every built-in component, like the one you just dragged onto the canvas, is registered and recognized, so it never touches that code path at all. Lesson 12 covers writing your own Custom Component deliberately, once you've seen enough of Langflow's other pieces for that lesson's own caution notes to make sense.
The code, piece by piece
gemini = GoogleGenerativeAIComponent()gemini.set( input_value=chat_input.message_response, model_name="gemini-3.5-flash-lite", api_key=os.environ["GOOGLE_API_KEY"],)GoogleGenerativeAIComponent is the real component behind the "Google Generative AI" box you dragged onto the canvas, importable and usable directly in code. model_name and api_key are the same fields you filled in by hand, api_key here is set from this project's own .env directly (Lesson 7 covers the better way to do this, without a raw key sitting in a Python file at all).
chat_input = ChatInput()...chat_output = ChatOutput()chat_output.set(input_value=gemini.text_response)This is the code equivalent of the edges you just dragged by hand. .set() wires one component's output method (chat_input.message_response) into another's input field (gemini.input_value), the same connection the canvas draws as a line between two dots.
graph = Graph(start=chat_input, end=chat_output)Graph is Langflow's version of StateGraph from the langgraph course, a container that knows the full shape of connected components and can run them in order.
rebuilt = graph.dump().dump() turns the graph into the same JSON structure the canvas's own Export button writes, this is exactly how flow.json in this folder was produced.
result = run_flow_from_json(flow=str(FLOW_PATH), input_value="Say hello in exactly three words.")run_flow_from_json is the headless path: give it a flow (a file path, or a dict, either works) and an input, it runs the whole flow start to finish with no browser and no running server needed for this call specifically, it loads and executes the flow directly in this process.
Checkpoint
- built-in components stay registered, and avoid a real Langflow-side bug that unrecognized (Custom) component types can trigger, more on this in Lesson 12.
.set(): wires one component's output into another's input in code, the same thing a dragged connection does on the canvas.Graph: the container for a connected set of components, this course's equivalent ofStateGraph..dump()/run_flow_from_json: turning a graph into JSON, and running that JSON headlessly, no browser required.
If anything here still feels unclear, ask before moving to Lesson 3.